

You do not need professional equipment or years of experience to install an epoxy garage floor yourself.
With the right preparation and a high-quality epoxy kit, you can create a durable surface that withstands vehicles, tools, spills, and everyday garage use.
The process starts with properly preparing the concrete, then applying the epoxy in even coats before sealing everything with a protective topcoat.
Taking your time during each stage is what separates a floor that lasts for years from one that starts peeling after a few months.
What is an Epoxy Garage Floor (And is DIY Worth It?)
Epoxy is a resin-based coating that bonds to concrete and cures into a hard, durable surface. Once applied correctly, it resists oil stains, chemicals, abrasion, and daily wear while giving your garage a clean, finished look.
The downside is real. Epoxy produces fumes during application, requires strict prep, and takes several days to fully cure.
Most failures happen because people rush the prep or apply it to unsuitable concrete. Cost is where DIY makes sense.
A professional job typically runs $3 to $7 per square foot, while doing it yourself costs around $1 to $3 per square foot.
If your floor is in decent condition and you’re willing to put in a full weekend of work, DIY is worth it.
Types of Epoxy to Know Before You Start
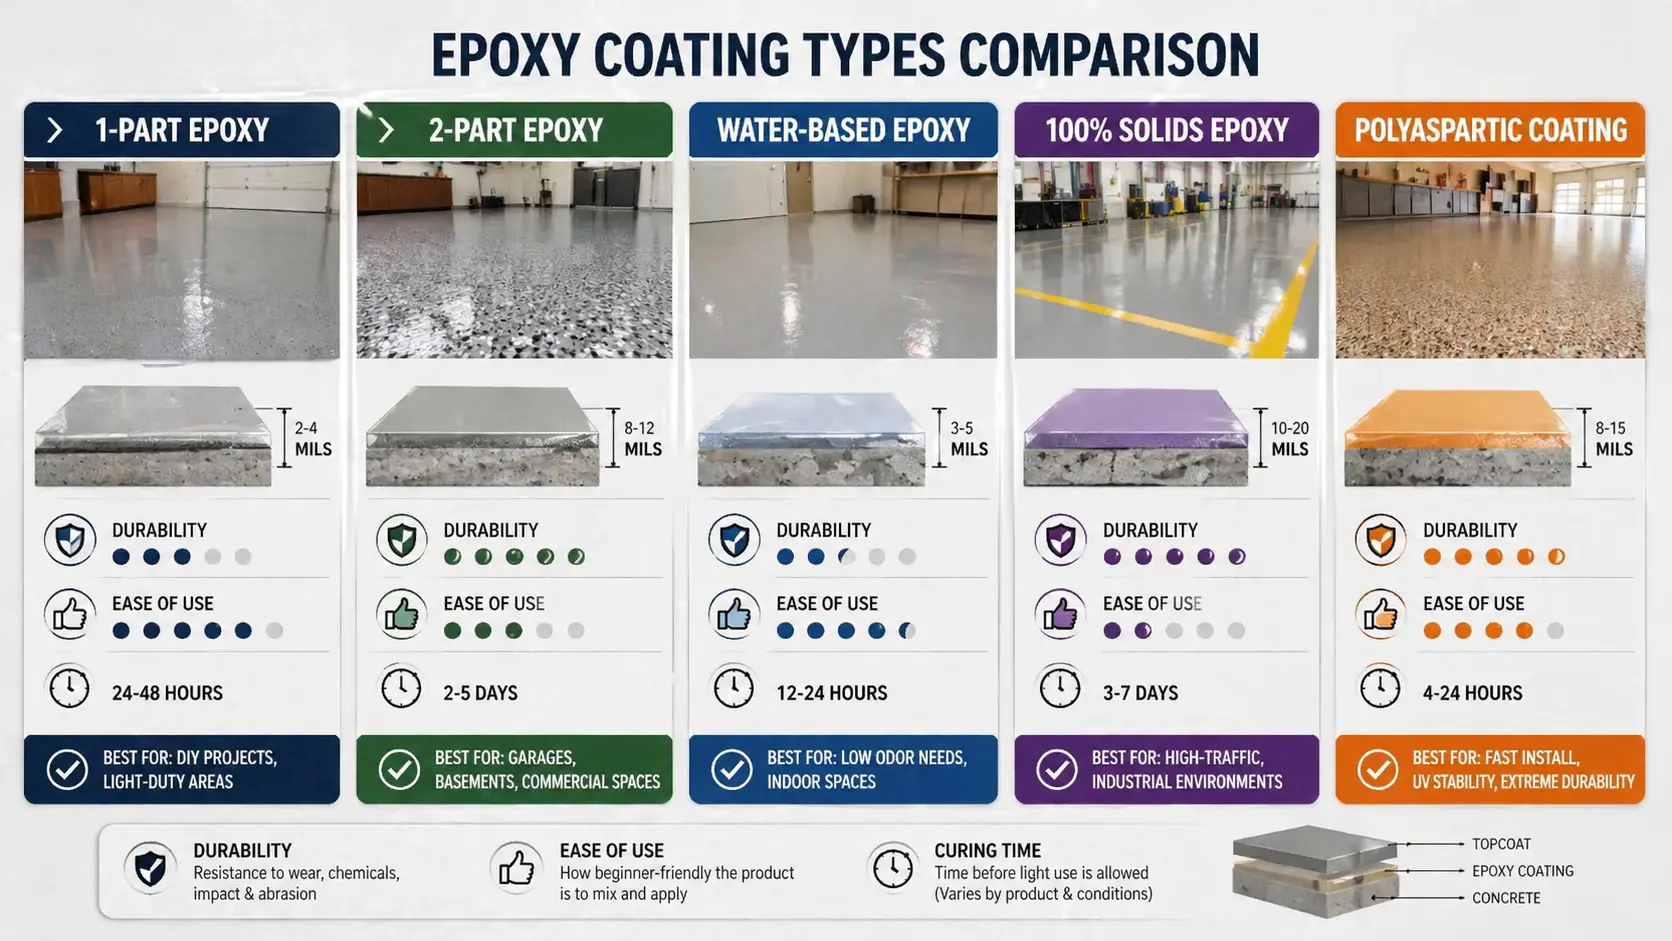
Not all epoxy is the same, and choosing the wrong type is one of the easiest ways to waste time and money.
- 1-part epoxy is pre-mixed and easy to use, but it behaves more like paint than a true coating. It’s fine for light-duty use, but it doesn’t last.
- 2-part epoxy combines resin and hardener to create a much stronger bond. This is the standard for garage floors and the minimum you should consider.
- Water-based epoxy is easier to apply and produces lower fumes, making it beginner-friendly. The trade-off is durability.
- 100% solids epoxy is significantly stronger and thicker, giving better long-term performance. It’s harder to apply, has a shorter working time, but lasts longer.
- Polyaspartic coatings cure faster and resist UV damage better than epoxy, but they’re less forgiving during application and cost more. They’re often used as a topcoat or in professional installs.
For most homeowners, a 2-part system is the baseline. The real choice is between ease of use and long-term durability.
Tools and Materials You Will Need
|
For gloves, goggles, and a respirator, follow the respirator selection guide from OSHA to make sure you are protected properly.
Before You Start: Will Epoxy Fail on Your Floor?
Not every garage floor is a good candidate. This is where most guides stay vague, but it matters.
If your concrete has moisture issues, epoxy will not bond properly. The plastic sheet test is a simple way to check. If condensation forms underneath, you have a problem that needs to be fixed first.
Previously sealed or painted floors can also cause failure. Epoxy won’t bond well unless the surface is fully ground down.
Oil-soaked concrete is another risk. Deep stains can prevent adhesion even after cleaning.
New concrete needs time to cure fully, usually at least 28 days. Applying epoxy too early traps moisture, leading to failure.
If your floor has any of these issues, fix them first or expect the coating to peel.
What Happens if Moisture Gets Under Epoxy?
Moisture is one of the biggest enemies of epoxy flooring. When water vapor rises through the concrete after the coating has cured, it can weaken the bond between the epoxy and the floor.
Over time, this can cause bubbling, peeling, discoloration, or complete coating failure. That is why testing for moisture before applying epoxy is just as important as cleaning and surface preparation.
How to Apply Epoxy to a Garage Floor: Step-by-Step
Getting a durable epoxy finish comes down to doing each step in the right order without rushing. Start with proper preparation, then move through application and finishing to make sure the coating actually lasts.
Step 1: Garage Floor Preparation (The Most Important Step)
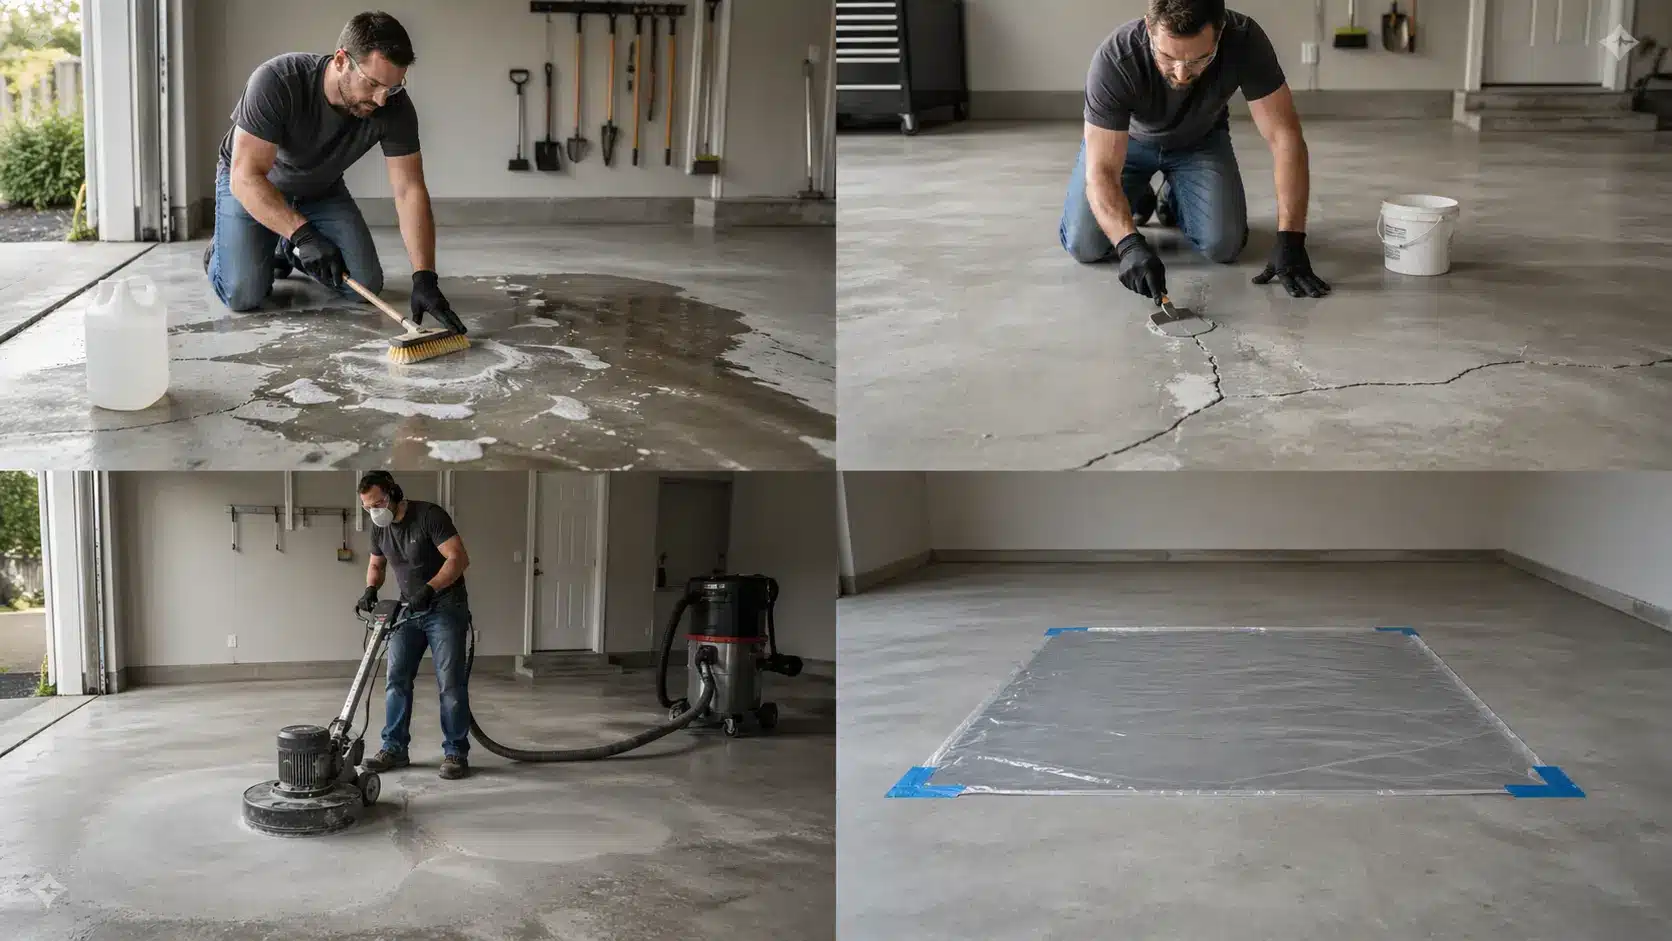
Most epoxy failures happen here. If the surface isn’t prepared properly, the coating will peel no matter what.
Start by thoroughly cleaning the floor with a degreaser to remove all dirt and oil. Let it dry completely before moving on.
Next, repair any cracks or holes with concrete filler and allow it to fully cure.
Now, open up the concrete surface so the epoxy can bond. Grinding provides the best, most consistent results.
Acid etching is cheaper and easier, but less reliable and can leave uneven coverage. If you care about durability, grinding is the better option.
Before applying epoxy, test for moisture. Tape a plastic sheet to the floor and leave it for 24 hours. If condensation forms beneath the floor, the floor has moisture issues, and epoxy may fail.
Step 2: Applying the Epoxy Coating
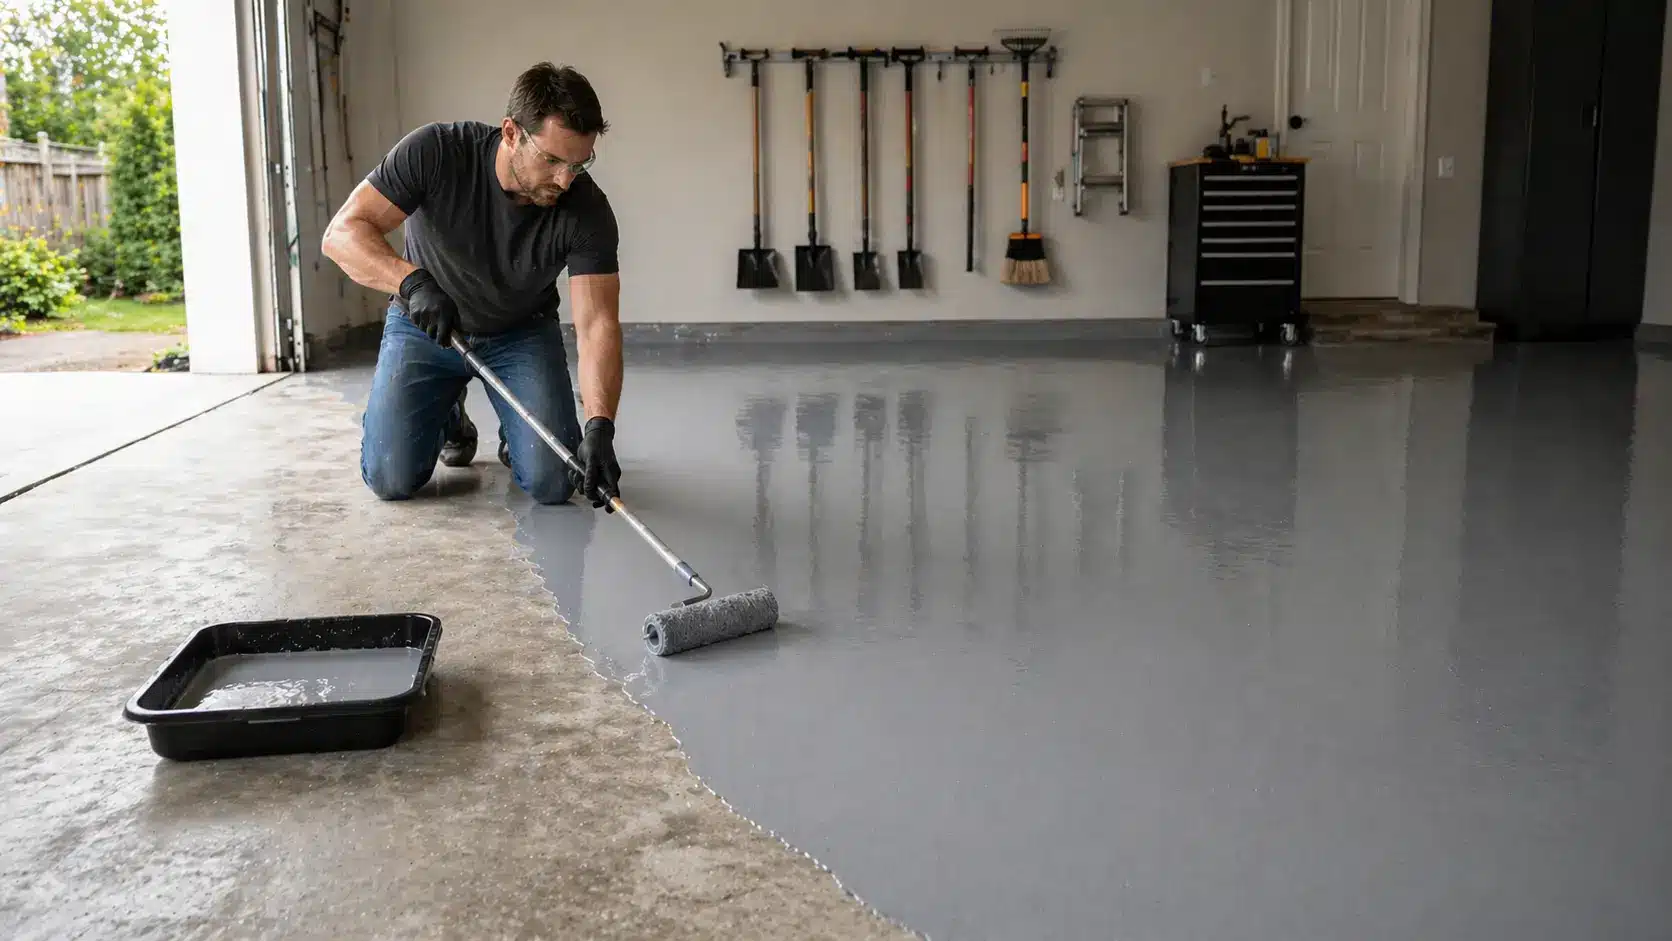
Once your surface is ready, mix the epoxy exactly as instructed. This is not flexible. Incorrect ratios or poor mixing will prevent proper curing.
You’ll have a limited working time, usually around 20 to 30 minutes, so only mix what you can apply quickly.
Start by cutting the edges with a brush. Then apply the epoxy using a roller, working in small sections from the back of the garage toward the exit.
Roll in one direction, then lightly cross-roll to even out the coating. Keeping sections small helps you avoid visible seams and uneven coverage.
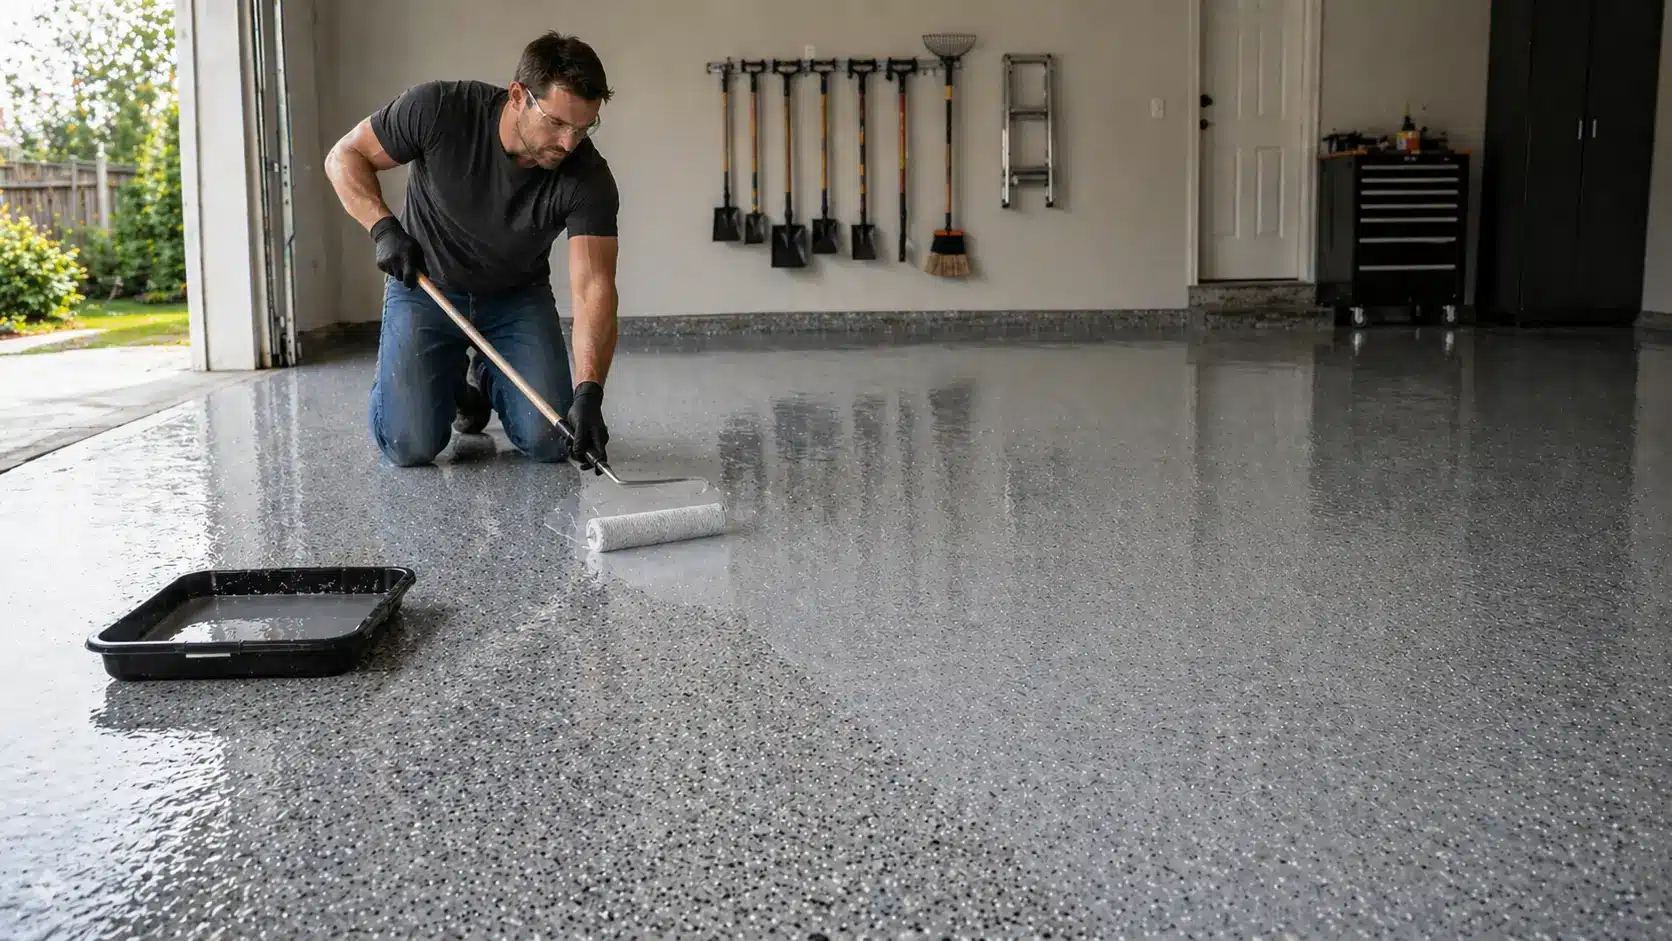
Step 3: Adding Flakes or Texture (Optional)

If you want a more finished look, decorative flakes can be broadcast onto the wet epoxy. They add texture and help hide small imperfections in the concrete.
For safety, especially in garages where water or oil is common, anti-slip additives can be mixed into the coating or applied with the flakes.
This step is optional, but it improves both appearance and functionality.
Step 4: Applying a Topcoat for Durability
A topcoat is not mandatory, but skipping it reduces the lifespan of your floor.
Polyurethane is a solid, affordable option that adds scratch resistance.
Polyaspartic topcoats cost more but cure faster and resist UV yellowing, making them a better choice for garages exposed to sunlight.
Applying two thin coats gives better protection than one thick coat and helps maintain a consistent finish.
Step 5: Drying and Curing Time
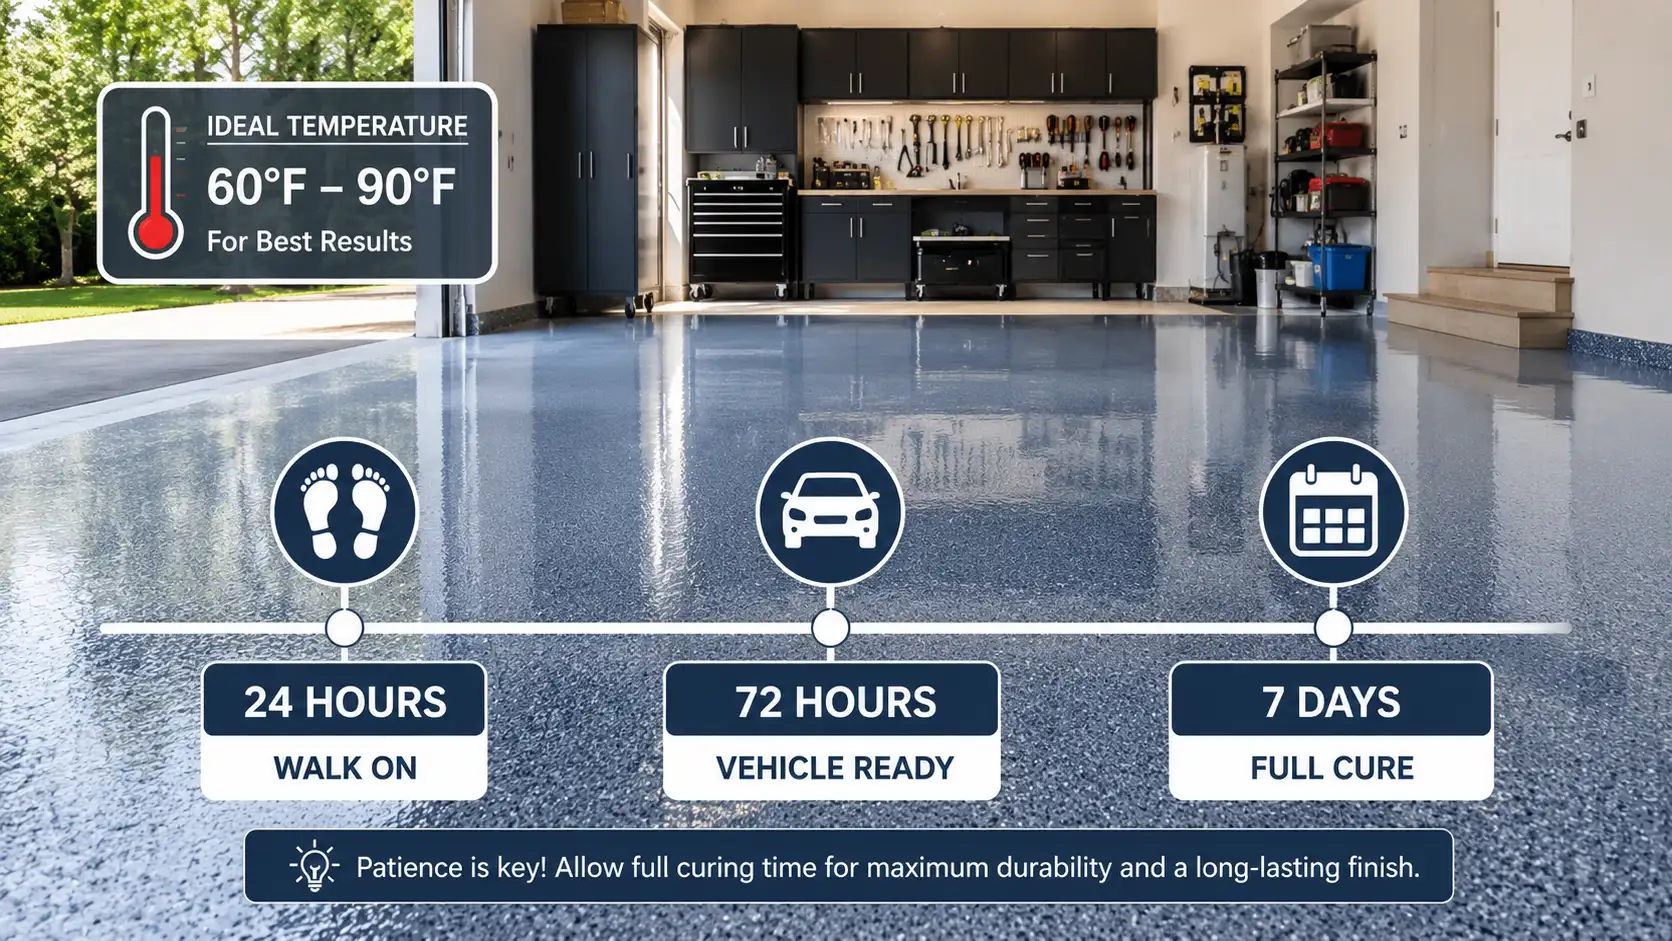
You can usually walk on the floor within 24 hours, but that doesn’t mean it’s fully cured.
Light use is possible after a couple of days, but for vehicles, waiting at least 72 hours is the minimum. A full cure can take up to 7 days, and rushing this step can damage the surface.
Temperature plays a big role. Ideal conditions fall between 60 and 90 degrees Fahrenheit. Too cold, and the epoxy may not cure properly. Too hot, and it may set too quickly to apply evenly.
Best DIY Epoxy Garage Floor Kits
Not all kits perform the same, and picking based on price alone is a mistake.
- Best for Beginners: Rust-Oleum RockSolid: If this is your first epoxy floor project, RockSolid is one of the easiest systems to work with. It is widely available, covers most two-car garages, and offers a good balance between durability and ease of application.
- Best Budget Option: Behr Premium 1-Part Epoxy: Behr’s 1-part epoxy is simple to apply and costs less than most two-part systems. It works best for light-duty garages where appearance matters more than maximum durability.
- Best for Long-Term Durability: ArmorPoxy: ArmorPoxy is designed for homeowners who want a stronger, professional-grade finish. It costs more and requires more preparation, but it offers better resistance to hot-tire pickup, chemicals, and heavy use.
The real decision comes down to your priorities. If you want something quick and beginner-friendly, go with Rust-Oleum Rocksolid.
If you care about long-term durability and don’t mind extra effort, ArmorPoxy is the better investment.
How Much Epoxy Do You Need?
The amount of epoxy required depends on your garage size and the coverage rate of the product you choose. Most DIY epoxy kits cover between 200 and 500 square feet.
| Garage Size | Approximate Floor Area | Typical Epoxy Needed |
|---|---|---|
| 1-Car Garage | 200–300 sq ft | 1 Kit |
| 2-Car Garage | 400–500 sq ft | 1–2 Kits |
| 3-Car Garage | 600–800 sq ft | 2–3 Kits |
Simple Epoxy Coverage Calculator
To estimate how much epoxy you’ll need:
Garage Length × Garage Width = Square Footage
For example, a 20-by-20-foot garage equals 400 square feet. If your epoxy kit covers 250 square feet, you’ll need two kits to complete the project.
Always buy slightly more than the minimum coverage requirement. Running out of epoxy midway through the application can create visible differences in color and texture.
DIY Epoxy Garage Floor Cost Breakdown
Before starting, it helps to know what you’ll actually spend so there are no surprises midway through the project. Breaking down the costs makes it easier to plan your budget and decide if DIY is worth it.
|
Item |
Estimated Cost |
|
Epoxy kit (2-car garage) |
$150 to $300 |
|
Concrete grinder rental |
$60 to $100 per day |
|
Rollers, brushes, trays |
$20 to $40 |
|
Crack filler |
$15 to $25 |
|
Safety gear |
$20 to $30 |
|
Total DIY cost |
$265 to $495 |
A standard 2-car garage is about 400 to 500 square feet. So, a professional job on the same garage runs $1,200 to $3,500. DIY saves you a significant amount.
Hot Tire Pickup: The Problem Most People Don’t Expect
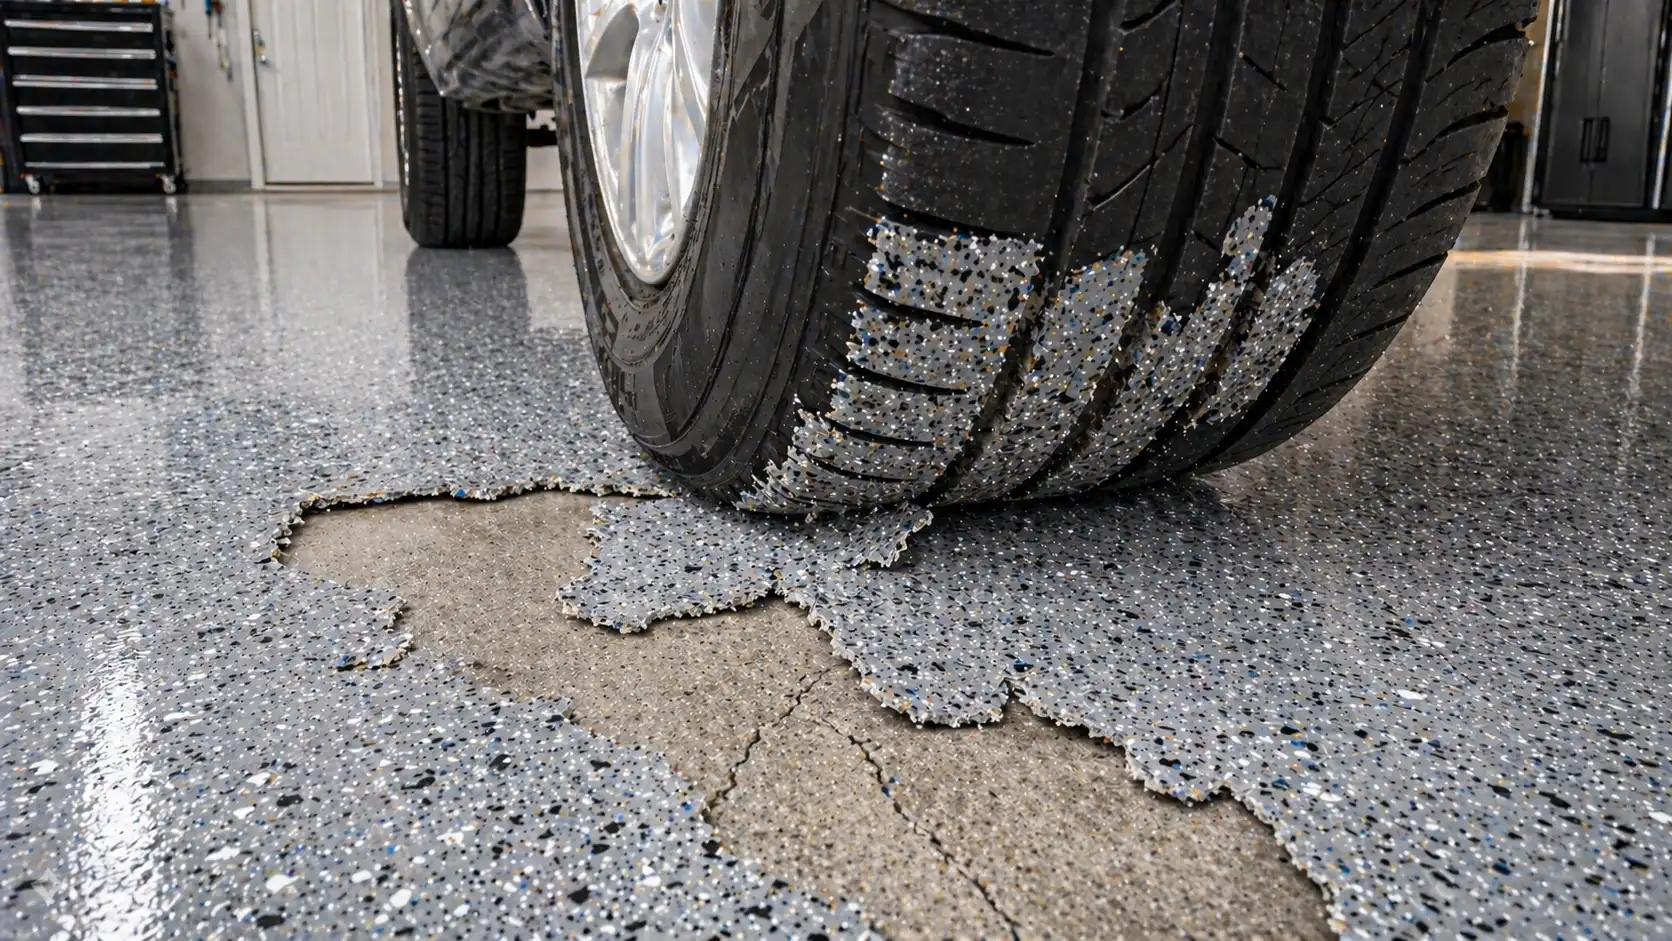
One of the most common reasons epoxy floors fail is hot-tire pickup.
When your car tires heat up during driving and then sit on the epoxy surface, they can soften the coating and pull it up over time.
This happens more often with lower-quality epoxy and poorly prepared surfaces.
Using a stronger epoxy system, applying a proper topcoat, and allowing full curing time before parking can significantly reduce this risk.
|
How Long Does an Epoxy Garage Floor Last? A DIY epoxy floor can last anywhere from 3 to 7 years, depending on several factors. Lower-end kits with minimal prep may only last a couple of years. A properly prepared surface with high-quality epoxy and topcoat can last 5-7 years. Heavy vehicle use, climate conditions, and maintenance all play a role. Floors in colder climates or high-moisture areas tend to wear faster. |
Common Mistakes to Avoid
Most epoxy failures aren’t random; they stem from a few predictable mistakes. Avoid these, and you eliminate the biggest reasons DIY floors don’t last.
- Skipping prep work: The epoxy will peel within months if the concrete is not properly cleaned and opened up.
- Applying epoxy to damp concrete: Always do the moisture test. Wet concrete kills adhesion.
- Buying cheap 1-part kits: They look the same on the shelf, but do not last. Stick with 2-part epoxy.
- Not mixing properly: Under-mixed epoxy will not cure properly. Follow the mix ratio exactly and stir for the full recommended time.
- Working in extreme temperatures: Too cold or too hot, and the epoxy will not cure correctly.
Maintenance Tips for Long-Lasting Results
Keeping the floor clean goes a long way. Regular sweeping removes grit that can scratch the surface.
For deeper cleaning, mild soap and water are enough. Harsh chemicals can damage the finish over time. If you use your garage as a workspace, protecting high-use areas becomes even more important.
For example, if you’ve set up a workbench or even a DIY standing desk in your garage, placing pads or mats underneath helps prevent scratches and pressure marks on the epoxy surface over time.
Protect high-impact areas with pads under heavy tools or equipment. Reapplying a topcoat every few years can significantly extend the life of the floor.
Conclusion
A DIY epoxy garage floor is one of the most cost-effective upgrades you can make, but only if you approach it the right way.
Prep is everything. Product choice matters more than most people think. And patience during curing is non-negotiable.
Do those right, and you won’t just get a better-looking garage. You’ll get a floor that actually lasts.
Frequently Asked Questions
Can I Apply Epoxy to My Garage Floor Myself?
Yes, you can apply a DIY epoxy garage floor if you follow proper prep and application steps. The key is surface preparation, as poor prep is the main reason epoxy fails.
How Long Does a Diy Epoxy Garage Floor Last?
A DIY epoxy garage floor typically lasts 3 to 7 years, depending on prep, product quality, and usage. Adding a topcoat and maintaining the surface can extend its lifespan.
Is Epoxy Flooring Slippery in a Garage?
Epoxy floors can be slippery when wet, especially when smooth-finished. Adding anti-slip additives or flakes improves traction and makes the surface safer.